
What to Do if Your Internet Access Is Blocked in Windows 10 by Firewall?
This post is a guide on steps to take in order to access the internet when a firewall is preventing internet access on your Windows 10 system. When trying to access certain web pages in Windows 10, you may get the error message “your Internet access is blocked”. In this case, what should you do to get rid of the error?

To protect your data and system, you may install an antivirus program on your computer or you use the built-in tool – Windows Defender since viruses, malware, and other malicious attacks are always threats to your computer. When using Google Chrome to visit some websites, you will get the following error message: “Your Internet access is blocked. Firewall or antivirus software may have blocked the connection.”
Ultimate Fixes for Antivirus or Firewalls Blocking Wi-Fi Internet Network:
Reboot your computer. Restart your router and modem. Use the LAN cable rather than Wi-Fi. Boot your PC to Safe Mode with Networking and connect the Internet again. Run Windows Troubleshooter to detect and fix the network issues. Update the firmware of the router or modem.
Check Firewall Exceptions from Windows Defender
Firewall and antivirus are configured to prevent potentially harmful programs from entering your system. Sometimes your browser, email client, etc are not added to the firewall exceptions list. As a result, “your Internet access is blocked” appears in Windows 10.
Step 1: In Windows 10, open Control Panel.
Step 2: Go to System and Security > Windows Defender Firewall .
. Step 3: Click Allow an app or feature through Windows Defender Firewall from the left panel.
from the left panel. Step 4: In the list, ensure the box of Google Chrome is checked and save the change.
Reset Antivirus to Default Settings
Sometimes a firewall or antivirus blocks Internet access since you meddled with the implemented firewall on your own or a particular update changed something. Resetting antivirus to its default settings seems to be a good way at hand.
If you are using Avast, open it, go to Settings > Troubleshoot > Restore factory defaults > Reset now.
Disable or Reinstall Your Antivirus
To fix a firewall blocking Wi-Fi, you can choose to disable antivirus.
As for Windows Defender Firewall, you can go to Control Panel > System and Security > Windows Defender Firewall > Turn Windows Defender Firewall on or off and then disable it.
Roll Back Network Drivers
The recent updates in network drivers can be troublemakers sometimes if your internet access is blocked. You can roll back to the previous version by getting into the settings of network drivers.
Press Windows key + X and go to Device Manager. Search for Network adapters and click on it.
Now, right-click on the Driver you want to revert and click on Properties.
Go to Driver and click on Roll Back Driver and then click OK.
Update Or Uninstall Your Network Adapter Driver
An outdated network adapter may cause a problem with your internet connectivity. You can update your network driver and check if your Internet access is blocked or solved.
If the issue persists or you are not able to update the drivers, then try uninstalling the network driver. The system will install updated Network drivers for you.
Top Causes That Lead To Blocked Internet Issue In Windows 10
It is undoubtedly annoying to see such messages in the middle of a crucial task. The leading causes of internet issues in Windows 10 are:
Malware or viruses that enter your PC via a downloaded file, infected USB drive or some malicious file. These viruses can change your network and browser settings, which in turn gives you, “Your internet access is blocked” error.
Many antivirus software has in-built firewall utility, which can also block internet access due to some suspicious websites or files.
Network driver issues can be one of the reasons for your blocked internet access.
If you are using the internet in office, school, college, or some public place, then access to some websites is blocked. In such cases, the only solution is to contact the authorities and get the issue solved.
Windows Firewall Blocking Connections
Windows Firewall is Blocking Connections
Outgoing connections can be affected by the presence of firewall or antivirus software on the local computer or network connection. Windows comes with a built-in Internet Firewall that is active by default and blocks all FTP traffic. You can turn off this firewall (not recommended by Microsoft) or configure it to allow connections via CuteFTP. Configure your firewall so that ports 20 and 21 are open (not blocked). It may also be necessary to grant specific permission for CuteFTP to access those ports.
Follow the steps below to add CuteFTP to the Windows Firewall exceptions list.
To add CuteFTP to the Windows Firewall exceptions list
In the Windows Control Panel, double-click Security Center, then click Windows Firewall. On the General tab, ensure Windows Firewall is On and then clear the Don't allow exceptions check box. On the Exceptions tab, review the Programs and Services list to determine if CuteFTP is listed. Look for: CuteFTP (the interface)
(the Transfer Engine) Both programs must be shown in the list of exceptions. If they are not, then follow the steps below to add either one or both programs to the list. Click Add Program. The Add a Program dialog box appears. In the Programs list, click CuteFTP, then click OK. The Add a Program dialog box closes. Click Add Program. The Add a Program dialog box appears. Click Browse to navigate to the CuteFTP installation folder (by default in C:Program FilesGlobalscape), click then click Open. Click OK to close the Add a Program dialog box and save your changes. Verify both programs appear in the Programs and Services list, then click OK to exit Windows Firewall. The firewall will now ignore the transfer engine and the interface.
Comodo Internet Security v6.2
Blocking Internet Access while Allowing Local Area Network (LAN) Access
You can configure Comodo Firewall to block Internet access while allowing free connections to an internal network (Intranet or LAN).
Example scenarios:
In your network at home, you want your child's computer to connect to other computers at home but disable Internet access to them for safety reasons
In your corporate network, you want your employee's computers to connect to your local network machines but disable Internet access for them for bandwidth restrictions
To selectively block connection to Internet whilst allow connection to internal network you need to create a Global Rule under Advanced Firewall Settings and password protect your configuration to prevent others from altering it.
To create a Global Rule
Open 'Tasks' interface by clicking the green curved arrow at top right of the 'Home' screen Open 'Firewall Tasks' by clicking 'Firewall Tasks' from the Tasks interface and click 'Open Advanced Settings'. Click 'Global Rules' under Firewall from the left hand side pane
Click the handle from the bottom and choose 'Add' from the options. The Firewall Rule interface will open.
Choose the following options from the drop-down menus:
Action = Block Protocol = IP Direction = Out
Enter a description for the new rule in the Description text box. Click the 'Source Address' tab, choose 'IPv4 Single Address' or 'IPv6 Single address' as per your network and enter the IP address of the computer in the IP text box. Click the 'Destination Address' tab, choose 'Network Zone' from the Type drop-down and choose your local area network from the 'Zone' drop-down.
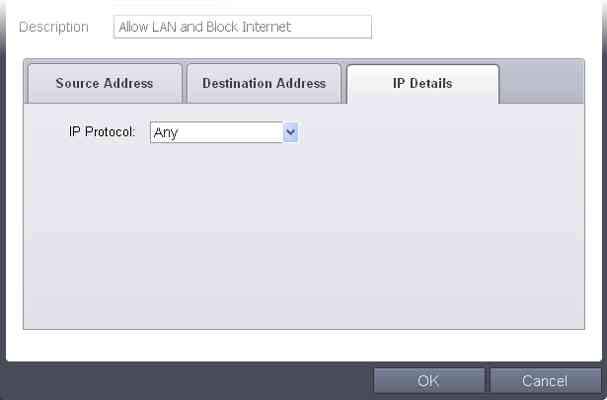
Click the 'IP Details' tab and choose 'Any' from the 'IP Protocol' drop-down.
Click 'OK'. The created policy will be added to the list of Global Rules. Select the rule, click the handle from the bottom and click 'Move Up' repeatedly until the rule moves to the first position.
Click 'OK' for your configuration to take effect.
Your Firewall is now configured to allow access to internal network but to block Internet access. Now you need to password protect this configuration to prevent others from changing it.
To password protect your configuration
Open 'Tasks' interface by clicking the green curved arrow at top right of the 'Home' screen Open 'Advanced Tasks' by clicking ' Advanced Tasks' from the Tasks interface and click 'Open Advanced Settings'. Click 'User Interface' under General Settings from the left hand side pane Select 'Enable Password Protection' under 'Parental Control' and click 'Set Password' link. The Change password dialog will appear.
Enter and confirm your password then click OK. Make sure to create a strong password containing a mixture of uppercase and lowercase characters, numbers and symbols so that it cannot be easily guessed by others.
The configuration is now password protected. From the next attempt to change any configuration changes to CIS, you will be prompted to enter the password to proceed.